DE:Potlatch 2/Primer
Dies ist eine Anleitung zur Bedienung des Editors Potlatch 2.
Starten: Siehe DE:Potlatch 2#Wo finde ich P2?. Potlatch läuft im Browser, und braucht nur ein aktuelles Flash Plugin, das auf PCs oft vorinstalliert ist, sonst gar nichts.
Ist man in OpenStreetMap registriert, und hat man sich angemeldet, kann man nach folgender Anleitung anfangen:
(Wer mehr Einführung zum Editor lesen will: DE:Potlatch 2 lesen!)
Ansicht
Hintergrundansicht
Hintergrundansicht ändern
Mit dem Background Menü lässt sich ein Hintergrundbild, z.B. eine Luftbildaufnahme, zur Unterstützung beim Editieren einblenden. Insbesondere für das Abzeichnen von neuen Objekten oder das Bearbeiten von bestehenden Objekten ist ein Luftbild hilfreich.
Hintergrundansicht mehr oder weniger stark sehen
Nach der Background Auswahl, lassen sich Helligkeit und Schärfe der Hintergrundaufnahme zum besseren Editieren der gewünschten Aufgabenstellung anpassen.
Verschiebung der Hintergrundsebene richtigstellen
Manche Hintergrundbilder sind nicht an den OSM Daten ausgerichtet, sie sind zu bereits bestehenden Daten verschoben. Um das Hintergrundbild an die korrekte Position zu schieben, bitte die Leertaste gedrückt halten und das Bild dabei ausrichten.
Kartenstil
Die Kartendarstellung von Potlatch lässt ebenfalls verschiedene Stile zu. Für bestimmte Arten des Editierens sind bestimmte Stile besser geeignet. Unter Bearbeiten können dafür auch eigene Tastenbefehle festgelegt werden.
GPS-Daten/meine Tracks
Selecting GPS data will display thin blue lines representing all gps tracks in the area. Selecting My tracks will enable display of your own tracks that you loaded into OSM via the GPS traces - upload a trace function (https://www.openstreetmap.org/trace/create) To switch gps traces off in the potlatch 2 editor, go to Background -> Vector file... and remove the tick from GPS
Editierwerkzeuge und Techniken
Before you begin editing, the first rule you need to know is the use of proprietary data. Data from copyrighted maps or any other proprietary data is strictly prohibited! Copying, tracing, or any act of reproduction of copyrighted work is not allowed! (Source: Copyright)
Please note: Linear features such as streets, footpaths, railways, and building outlines will hereby be referred to as ways.
Elemente anlegen
Potlatch benützt umfangreiche Tastenkombinationen!
Upon creating new features, be sure to tag them. See the Tagging Features section below for more information.
Punkt (oder node) anlegen:
- sicherstellen, dass gerade kein Element markiert ist,
- Ikone von der Seitenleiste zur Karte ziehen
oder
- Doppelklick zu Anlegen des Punkts wo auch immer
- Seitenleiste durchsuchen, und den richtigen "tag" mit den passenden Eigenschaften und Ikone anlegen.
Weg anlegen:
- dort klicken, wo er anfängt
- dort weiter klicken, wo notwendige Zwischenpunkte notwendig sind
- mit Doppelklick oder enter beenden
eigenständigen Verlängerungsabschnitt für einen Weg anlegen:
- shift-klicken an dem gewünschten Endpunkt des bestehenden Wegs
- wie üblich fortfahren
- auch ein eigenständiger "tag" wird in diesem Fall benötigt
Hinweis: siehe nachstehend falls zutreffend einen Weg verlängern (wo keinen eigenständigen "tag" benötigt wird).
Vieleck anlegen:
- dort klicken, wo der Anfangspunkt sein soll
- weiter klicken, ähnlich wie bei einer Weglinie, überall wo nötig
- am Schluss auf dem Anfangspunkt wieder klicken, um den Umriss zu schliessen
Hinweis: dieser Punkt bekommt dann einen kleinen schwarzen Ring.
Grundkenntnisse in Editieren
Punkt in einem Weg hinzufügen:
- Weg markieren
- shift-klicken an der gewünschten Stelle
Hinweis: Vermehrung der Punkte hilft, die Gegenständen anzugleichen, und die Kurven runder zu gestalten.
Punkt entfernen:
- Punkt markieren
- virtuellen Löschknopf in der unteren rechten Ecke anklicken (oder die Rückschritt-Taste der Tastatur betätigen)
Weg löschen:
- Weg markieren
- virtuellen Löschknopf in der unteren rechten Ecke anklicken (oder die Rückschritt-Taste der Tastatur betätigen)
Punkt verschieben:
- Punkt markieren
- verschieben
Weg verschieben:
- Weg markieren
- als ganzes verschieben
Hinweis: achten, einen Segment zu wählen, wo man keinen Knoten mitverschiebt!
Weg verlängern:
- einen Weg-Endpunkt anklicken
- weiter zeichnen wie sonst.
Editieren vertiefen
Weg-Verknüpfung herstellen (siehe auch Frage/Antwort in Hilfe-Zentrale):
- bestehender Weg markieren und anschauen (ein Punkt auf diesem Weg dort nötig)!
- zeichnen bis unmittelbar vor der Verknüpfungsstelle
- mit der Maus beim letzten Schritt über den Punkt (oder die Punkte, falls mehrere) auf dem anderen Weg spielen
- Obacht geben: falls nicht jetzt schon blau, leuchten die Punkte jetzt in blau an!
- exakt, wenn dabei ein Punkt blau anleuchtet, den letzten Klick geben!
Hinweis: Dies erzeugt einen Knoten für den korrekten Routing!
Weg-Verknüpfung rückgängig machen:
- Punkt, wo die Weg-Verknüpfung gegeben ist, markieren
- Zeichen Minus (-) antippen
Fahrtrichtung eines Wegs umdrehen:
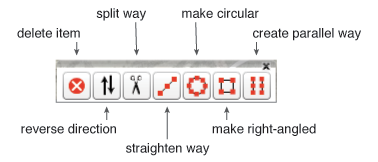
- die virtuelle Taste «Reverse Direction button» in der rechten Fussecke anklicken
Hinweis: ist nur bei Einbahn-Wege (Einbahnstrassen, Küstenwege usw.) von Bedeutung.
- Die Richtung vom gewählten Weg wird mit einem Pfeil am Reverse Direction button angezeigt! Siehe auch die anderen Möglichkeiten die Wegrichtung zu identifizieren.
Weg zerstückeln oder unterteilen:
- Punkt an der Stelle, wo die Trennung stattfinden soll, markieren
- die virtuelle Taste «Schere» anklicken (oder X auf der Tastatur drücken)
Hinweis: kann sehr hilfreich sein, um andere "tags" für spezifische Wegeeigenschaften gezielt einzutragen.
Beispielsweise für folgendes nützlich: Eine Überquerung sollte geteilt werden und separat als Brücke getaggt werden. Straßen sollten an Ländergrenzen geteilt werden, falls sie in den Ländern jeweils verschieden getaggt werden sollen.
Weg begradigen:
- Weg markieren
- die virtuelle Taste «Straighten Way button» in der rechten Fussecke anklicken.
Hinweis: alle Punkte, die keine Verknüpfung bilden, fallen dabei weg!
Weg kreisförmig gestalten:
- Weg als Vieleck anlegen
- die virtuelle Taste «Make Circular button» in der rechten Fussecke anklicken.
Weg schön eckig gestalten:
- Weg als Vieleck anlegen
- die virtuelle Taste «Make Right-Angled button» in der rechten Fussecke anklicken.
parallel verlaufenden Weg anlegen:
- Weg markieren
- die virtuelle Taste «Create Parallel Way» (oder P auf der Tastatur drücken)
Hinweis1: besonders relevant, wenn parallele Wege in Wirklichkeit bestehen, aber nur einen einfachen Weg gezeigt wird.
Hinweis2: zeichnet man von Hand einen parallelen Weg (Radweg) oder Körper am Rand eines breit dargestellten Wegs ist genügend Abstand zur Sichtbarmachung nötig!
Verknüpfungen editieren
To edit a relation in Potlatch 2:
- select a node or way which is a member of that relation
- select 'Advanced' on the left to see the relation list
- double-click the relation
Then, click 'Members' to see the members in order. You can change the order by dragging the list entries.
To add this relation to another, 'parent' relation, click 'Advanced' and then 'Add to'.
Tagging
Tagging is a major aspect of editing in OpenStreetMap. Fortunately, this process has been simplified over the years to reduce errors and unconventional tags from being used.
A great resource you should probably have bookmarked is DE:Map_Features. It describes the differences between the various tags and what additional tags should probably be captured.
Tagging a point with drag/drop
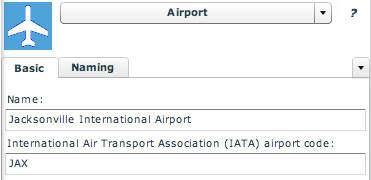
When creating a new point feature, dragging an icon from the sidebar to the map will automatically take care of some basic tagging. For example, when you drag an airport icon to the map, Potlatch has already tagged it as an airport.
Just as a side note, click the Advanced tab on the bottom. You will see the key=value pairs that make up the airport tag. aeroway=aerodrome is what's used to tag an airport in OpenStreetMap. It's not the most intuitive tag (at least in the United States), nor very memorable so we should feel quite fortunate that Potlatch has taken care of this for us. Now that you've seen how complex tags can get, click on the Simple tab to return to where you were.
With the feature still selected, refer to the sidebar again and begin typing in the airport's name in the Name field to add additional tags. Browse through all the fields and tabs, and fill out as much information as you can.
Once you're satisfied with the tags you have added, save, and move on to your next edit!
Tagging a point with double-click
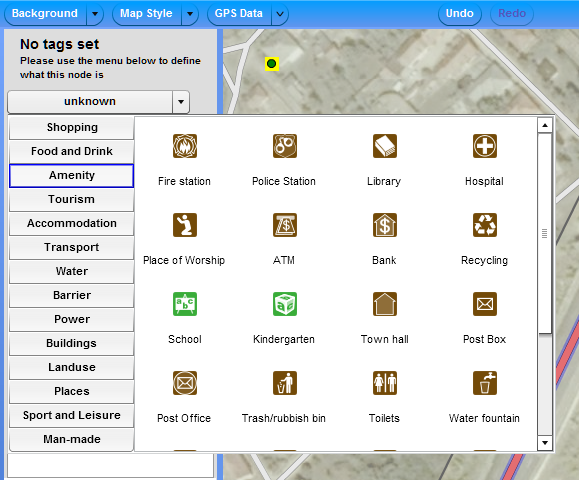
If you had already created a generic point by double-clicking on the map, you'll need to edit the tag manually or else no one will know what the point represents. Make sure this point feature is selected and choose the appropriate tag via the drop down menu in the sidebar currently labelled unknown.
Once you've chosen the correct POI type, browse through all the fields again and fill out as much information as you can.
Tagging a way
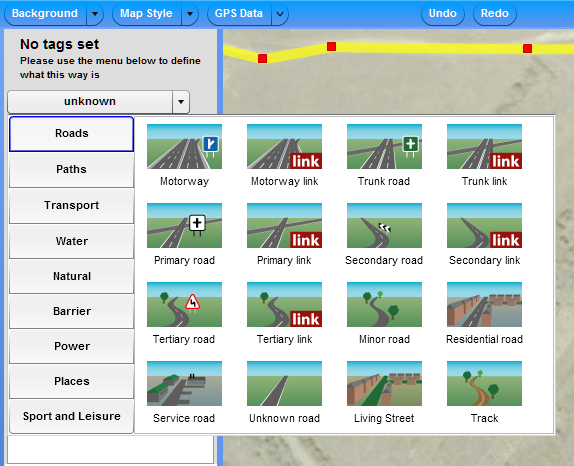
Unlike tagging a point, you can't drag and drop a primary road onto the map. You'll need to first draw the way and manually edit the tag later. Begin by drawing your new way and with the feature still selected, choose the appropriate tag via the drop down menu in the sidebar currently labelled unknown.
There are a number of similar options here regarding the road types, transportation, etc, so please don't forget to refer back to the Map Features documentation.
Once you've chosen the correct way type, browse through all the fields again and fill out as much information as you can.
Tagging multiple ways in one go
Often, multiple ways must be tagged identically. For example, a city street often consists of several ways, and while some tags will be different, many (such as highway=residential and name=Main Street) will be the same. To make this easier, you can select multiple ways in one go, using Ctrl-Click (Command-Click on a Mac). Then, the detail pane will allow you edit tags which will apply to all selected ways. Tags which have different existing values for different ways will be marked as '<different>'.
Importing (GPS, shapefiles, etc.)
In the Background tab, click the Vector File button and choose between GPX, OSM or a Shapefile to assist you with your editing. Currently there is no way to import a local file (ex. a file from your own computer).
Undoing
Undo a single edit
If you make a mistake, you can always hit the Undo button or press Z on your keyboard.
Undo all edits for a feature
Pressing the Esc key will undo all your edits for the current feature.
Saving
Saving with a comment
When all your edits are complete and look satisfactory, click the Save button and a small dialog box will prompt you to add comments on the edits you made. OpenStreetMap encourages users to leave a comment informing others of what changes were made and why.
Remember that any edits you save will not be immediately visible on OSM maps. This generally takes several hours so don't worry if you don't see your changes right away.
Note: If you want to close your changeset after saving, use the C shortcut.


