MLIT ISJ/import2019 outline/workflow
Procedure in common
Quick overview using Overpass Turbo
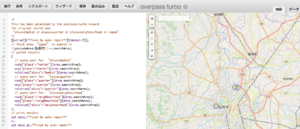
This Overpass Turbo query shows if there is existing place node for target area.
https://overpass-turbo.eu/s/M1f
Replace "弘前市" (Hirosaki-city) with the target name of municipality.
// fetch area “Japan” to search in
{{geocodeArea:弘前市}}->.searchArea;
If no data is returned, go to `Case: No existing data` clause.
If some data is returned, go to `Case: There is existing data` clause.
Case: No existing data
Load the target dataset using JOSM
Pickup the target .osm file in Github repository, and load it into JOSM.
Check your account if it is for import.
Upload it to osm.org using JOSM.
Set following tags onto changeset.
- source=ISJ_2019
- source_ref=https://wiki.openstreetmap.org/wiki/MLIT_ISJ/import2019_outline
Set following text into changeset comment. Replace [地域名] with target.
``` ISJ import for [地域名] #ISJ_import_2019 ```
mark the Check list
As the upload finished, mark as `finished` on the checklist on Github.
Case: There is existing data
Load data with Overpass Turbo
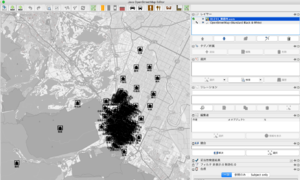
Load the result of query from Overpass Turbo.
You can "Export" in Overpass Turbo, then "Load the data with JOSM".
Target data will be loaded as a layer. Remember you should turn on the JOSM remote load settings.
Load the target dataset with JOSM
Pickup the target .osm file in Github repository, and load it into JOSM.
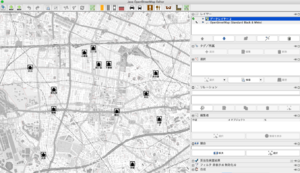
So, you have 2 layers in JOSM. One is from Overpass Turbo, the other is .osm from import.
Setting of Conflation plugin
Activate Conflation plugin.
You can see Conflation Icon on the right pane of JOSM.
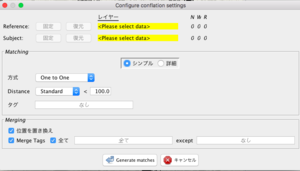
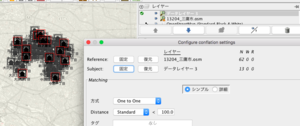
Click "Preference" button to show following panel.
Input target features and layers on "Reference" and "Subject" column at Upper left column.
- "Reference": Add .osm file layer for import, then select all of the nodes on the layer, then click "Fix".
- "Subject": Select Overpass data layer, then select all of the nodes on the layer, then click "Fix".
- Set Distance value to 100 (Default is 30. This means it will detect similar nodes within 100m)
- "方式" setting is OK either "One to One" or "Disambiguating".
- Click "Generate match" to start comparison
Meaning of "match", "Reference only" and "Subject only"
There are several columns on Conflation panel, each column means...
- match: Pairs of nodes that are potentialy to be the same node
- Reference only: Data exists only in the Reference side layer (the .osm file to be imported)
- Subject only: Data exists only in the ubject side layer (OSM existing node)
Todo for `match`
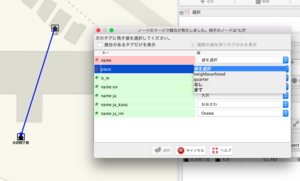
`Match`ed node could be validated for tags with "conflate".
In this case, existing node is a quarter node after "丁目" divided.
If it is available for conflation (in the case of both 2 nodes are neighbourhood level), you may conflate them in Subject layer. History of Node is Existing node's one.
In this case simple merge is not available, so you should copy that node from .osm file into Subject layer. You can use JOSM menu `Merge selected`.
Todo for Reference only
This case means only .osm file has such a node.
Use Right click to pan the target node. Check around if there is another node, then merge it with "conflate" button.
Todo for Subject only
This case means only Subject layer has such a node. This is just a reference information.
Upload data
Check your account if it is for import.
If the merge process is done, select Subject layer and upload them into osm.org.
Case study for conflation
The following is a list of possible cases and how to handle them.
existing node has tags, e.g. name:ja
If existing data has tags, those tags should be remain.
(name:ja_rm and name:ja-Latn normalization is not the scope of this import)
quarter and neighbourhood is didived already
only quarter node exists
- Keep existing quater node.
- Add new neighbourhood node.
- Do not make quarter>neighbourhood structure
As a result following data will be made.
- existing quarter node. (e.g. named as "ひばりヶ丘")
- new neighbourhood nodes. (e.g. named as "ひばりヶ丘一丁目" from import .osm)
only neighbourhood node exists
- Merge neighbourhood nodes.
- geometry: use the geometry of existing node
- tags: check tagging structure and set name tag from import .osm.
Both quarter and neighbourhood nodes exists
- Keep existing quarter node.
- Merge neighbourhood nodes.
- geometry: use the geometry of existing node
- tags: check tagging structure and set name tag from import .osm.
name tag normalization
Normalize as ISJ dataset. (丁目 is written in 漢字 charactor, like 一丁目. not 1丁目)
Sample: name=ひばりヶ丘1 will be switched into name=ひばりヶ丘一丁目
place tag on polygon
Place tag should not be used on Boundary polygon.
Place name which is not in address structure.
In the case of commonly used place name such as `○○ Onsen` or place name for natural.
If those node has place = quarter, neighbourhood or hamlet, replace it with place=localty.
