OpenPoiMap
- Do not confuse with OpenPOIMap in Switzerland.
|
OpenPoiMap Taglocator | |
|---|---|
 Amsterdam, Netherlands | |
| Author: | Marc Zoutendijk |
| Slippy map: | OpenPoiMap.org |
| Source code: | https://github.com/marczoutendijk/marczoutendijk.github.io |
OpenPoiMap (formerly Taglocator) is a web application that helps you in finding various tags of interest on OpenStreetMap. Such tags are often called Points of Interest: - POI.
OpenPoiMap is not limited to a specific region or country and can be used anywhere you can use OSM.
As of 10 February 2015 Taglocator has the name: OpenPoiMap (at least in the international version). Starting with this version there is no a or b version anymore.
I (Marc Zoutendijk) developed the tool mainly for my own use to check if all the objects I had mapped, had all the necessary tags without errors. Quickly it turned out to be useful for others as well and I started to improve it and added more features.
Version 1.29e is the current version.
Sourcecode is on [1].
OpenPoiMap is available under its own domain name:
At any time the version number can be followed by a number of "+" signs, denoting small improvements/bug fixes.
Development of Taglocator started in November 2014.
Starting with version 1.29e, openpoimap is now hosted directly on Github
Please note: Screenshots on this page do not always reflect the current screenlayout of OpenPoiMap!
On 2015-09-22 a German translation of OpenPoiMap became available as Beta-version [2]
See discussion on the German forum [3]
Please note that this German version is no longer maintained by me.
Introduction
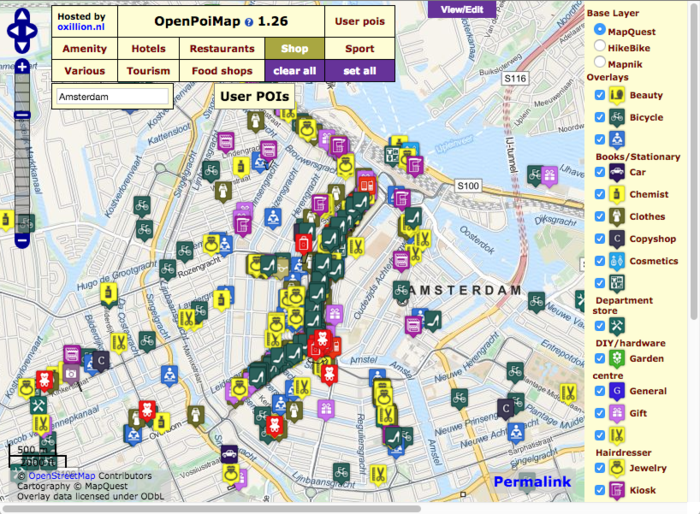
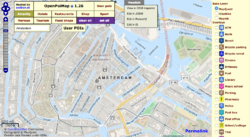
On the main screen (see first picture on the top right - click for a larger version) you see the following parts:
- the main map in Mapnik rendering
- a zoom slider with 4 navigation buttons
- a search field to enter the city, street, or country of your interest. The search is always in the Nominatim database.
- a window with the title, help-file link, version and 9 clickable buttons
- a User Pois window to enter your own selections of tags. It opens when you hover over.
- a window with the pre-defined selectable pois (or tags) for the current layer
- a permalink button
You'll find the following groups of tags to choose from:
- Amenity
- Tourism
- Hotels (and other places to stay)
- Sport
- Shop
- Food (shops where you can buy food)
- Restaurants (and other places where you can eat)
- Various
- User selected pois
You recognize the well known standard groups for pois from the OSM wiki Map Features
I created a few sub-groups of items that belong strongly together like Restaurants (places to eat) and Hotels (places to sleep).
The group Various is a collection of tags that don't fit well in any particular subgroup. Finally there is an option to set up a list of your own (called User pois) where you can search for tags that are missing from my preselected choices or are spread among different layers.
The purpose of this tool is to help you in locating on the map (in the area of your choice) where specific tags are. I wrote the tool because I wanted to know where in my hometown all the bakeries were located, but then I found out that none of them had the tag shop=bakery attached to their maplocation. But now they do!
Please note: This tool uses the Overpass turbo to retrieve its data. If you use it for frequent requests with all layers checked, you might get no results at all (or after a very long time) because of the overload on the server. Abuse might even get your ip-address blocked.
How to use?
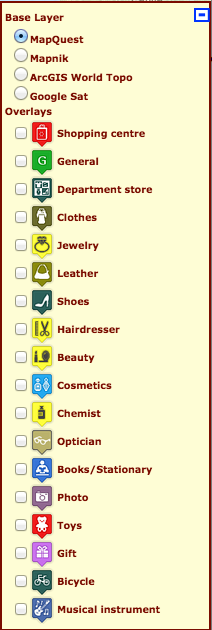
The picture (right) shows the details when Shop is selected from the available layers. This list is subdivided in at least two groups:
- Base Layer where you can choose the map type (as of version 1.27: Mapnik, World topo, Positron).
- Overlays. A selection of available choices that you might wish to show on the map.
Depending of the layer you choose from the menu, you’ll see a list of possible tags (by default none is selected). If the list is longer than will fit on your screen, you can scroll with your cursor in the list. Note that by doing so the bottom section of the map is not automatically updated and stays blank because the scrolling includes the map as well! This will be fixed in a later version.
Select the tags you wish to see on the map and wait. You can select all the tags at once by clicking on the set all button. Deselect any (or all) tags with the clear all button. If your zoomlevel is too small you see an indication that you have to zoom in. If any tags you selected in the list are available on the map, they show up with the icon (marker) that belongs to that tag. If you switch to a different layer, your selections on the list are preserved between menu choices. The list on the right side can be closed with the close button on the top right corner. If, after you have found the tags you were interested in, you type in a new name in the search box, the selection is not erased. So comparing the pub-density between London and Dublin is now easy! If you drag the map around or zoom in/out, the map gets updated to show more or other pois. On the screenshot above (in the introduction part) you see a number of POIs that were selected from the list with available shops (the map shows a part of Amsterdam). If you start selecting pois in the list, you might see (on the top of the main screen) the indication that you have to zoom in, in order for the pois appear on the screen. Whenever you click on one of the icons, a popup window shows all the available information about that poi. If you are not zoomed-in enough, the popup will notify you.
The popup window
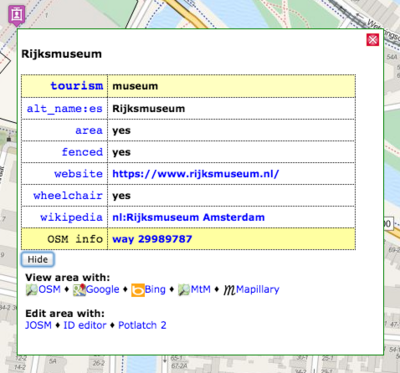
On the screenshot from the popup window (see left), information is shown (again the map is Amsterdam) that is available for Rijksmuseum.
To get this popup window, first you make sure that Amsterdam is in the centre of the map and you have zoomed in enough to see the streets of that city on the map. You also can search for Rijksmuseum in the searchbox. Then you choose Tourism from the main menu and then select the museum tag in the poi-list. After you found the icon for the museum on the main map, click on it and this popup window will show. You must click, hover over is not working.
In the top of the popup you see the name of the tag (if it is available!) as well as the operator - mostly with fuel stations, atm and the like. Again: only if this data is available.
Also streetaddress, postalcode and city are shown whenever this data is avalaible.
In the table itself you see 2 columns:
- The Key
- The value for that key
Keys that belong to one of the main groups (Amenity, Tourism etc) are shown in the top of the table against a different background. All remaining keys follow in alphabetical order. All the keys are clickable and will show you the relevant wiki page for that key.
Website and Wikipedia links are also clickable and so are e-mail addresses.
In the Netherlands all Windmills are also documented in a few online databases. If that is the case, a link to that database (for the Windmill of your choice) is available.
Also all monuments (in The Netherlands - ref:rce) in the dutch Monument Register are active links into that register.
If there is an image available it will be shown as a small thumbnail whenever possible, otherwise it is an active link (but sometimes shown with a missing image sign.
Images that have an unknow license are also marked as such.
Whenever a colour code is included in the value, that colour is shown as well. Note that the correct spelling for the colour tag is the British spelling, in case you want to start tagging objects yourself.
The last line in this table is always a clickable link to that node/way/relation on the OSM map.
Finally you'll find at the bottom of the popup window a button that opens an area with a number of links to open different views and editors for the data currently visible on the screen.
When you click the JOSM link, it opens the JOSM editor with the object you clicked on as a slected item in the JOSM editor. JOSM must be running for this to work. Clicking on this link will not start JOSM if it is not running.
The button you clicked to open the area with views and editors, remembers its state. So if you open it for one object, it stays open for all next objects as well, untill you hide it again.
As of version 1.26 there is now a new button on the top of the screen (label: View/Edit) which opens (hover-over) a small menu with four choices: JOSM, iD, Potlatch 2 or OSM Inspector. With these choices you can open the current mapview in the editor you choose from the menu, even if nothing is selected on the map. So you now can start editing right away from within OpenPoiMap.
The User Pois
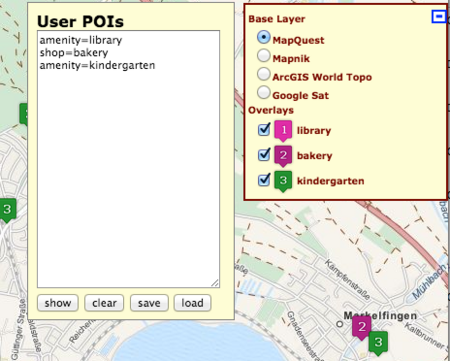
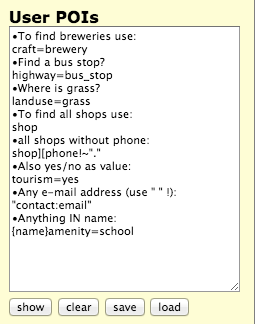
If you move the mouse pointer over the User POIs label (top of the screen), a popup opens with an area with some information about this functionality. You can clear this area with the clear button and then enter your own selection of key=value combinations.
You can enter any value that is allowed in the OSM database.
E.g. this is a valid query:
landuse=grasshighway=bus_stopcraft=brewerytourism=yes
If you want to find all the shops in an area, just enter: shop
Read on below for some pitfalls with this!
If you want to find POIs that have 2 keys in common (like tourism AND man_made or shop AND craft) use this:
tourism][man_made
And a more complex one:
shop=books][wheelchair=yes][website][phone
will find all bookstores that have wheelchair access, a website and a telephone! Note: there is no concluding ] bracket!
The text you enter in the User POIs field will be copied directly to the overpass query, hence anything that is valid code there, is also valid code here. This makes it possible to set up a query that specifically ommits a key, like so:
shop=books][phone!~"."
will show you all the bookstores that have NO phone listing!
You can learn much more here: Overpass API/Language Guide
For keys with multiple parts, separated bij a colon (name:nl, contact:email), you should put your query between (single/double) quotation marks: "contact:email"
Be also aware of this pitfall:
If you think you can find all schools and thus enter school in the User Pois field, followed by clicking show, you only see the objects that are being tagged with school=* (primary, secondary etc.).
This is because for OSM a school is an amenity, and that key has prevalence over the other one (amenity=school will do the job, but because that choice is allready available in my list, it's rather pointless to type it yourself!).
The User Pois come in handy if you are looking for a specific tag that is not included in the presets from the menu or if you would like to combine tags from different groups at once.
If you click the show button, the list with overlays (at the right side of your screen) is filled with your choices. By default everything is selected and the map shows your selection. Be aware that some pois can take more time to fill the map than others..
Because it is not known what tags the users will put in this list, the icons used to show your selection consist of different colored numbered icons: 1, 2, 3 ...
If you would like to keep your selection for re-use at another time, press the save button. You can save as many sets as you like. Pressing the load button cycles you (in reverse order, e.g. last choice first - LIFO) through all your saved sets. Because your sets are saved in cookies, you must allow cookies in your browser.
Your choices are kept for 365 days (from the day you pressed the save button for that particular set), thereafter the cookies (for that set) are erased.
Searching in a specific place
Searching for Pois in a certain location (city,place,town) is also possible, with the following syntax:
{Place to search in}value to search
Looking for all shoe shops in London? {London}shop=shoes will do it.
Be aware that the place to search in is case sensitive and that the results are unclear if more than one place to search exists!
- Please note
- The map is not automatically moved nor zoomed in to your place of search! This functionality is still under development.
Searching two tags near to each other
Version 1.05 added the possibility to search for one tag that is within a given distance from another. That might be helpfull if you are looking for a restaurant but first need an ATM to get the money to pay in the restaurant.
The syntax is:
amenity=atm(100)amenity=restaurant
This will find any restaurant that has an ATM within 100 meters.
You can only use this new function with single tags, but multiple choices for the value are possible:
amenity=atm(100)'amenity'~'restaurant|pub|cafe|bar|fast_food'
- Please Note
- currently this specific search function only works with nodes
 . Ways
  and Relations
  can't be found.
Quirks and remarks
The tag for a point-object like a mailbox, bench etc. is usually placed on the node for that object. Putting a marker (icon) on the map for that object is not difficult and clicking on it gives the result you expect.
However, objects that have a larger size like a museum, school or sports-centre are often drawn on the map with the outline (contour) of that object. In such a situation the marker is usually drawn within the area of that object and you can click anywhere within that area to activate the popup.
Sometimes however, depending on some very particular ways of mapping, clicking inside the contour is not working and you really have to click on the icon.
On some objects you'll see more icons that are all connected to the object but show different parts of it. Parts, however, that are somehow connected to the main object and hence will be shown on the map.
When using tags like fixme you sometimes see a great number of icons along a line in what is obviously a railway track or high-voltage line. This is so because that object is part of a way and every node in that way will get the icon.
In very rare occasions there seems to be a clickable link to the OSM node/way/rel, but with a missing ID. In such a case you have to zoom in and click again. In even rarer cases even that doens't help...
The default map layer is Mapnik. Two other layers are available from the top of the menu at the right side of the screen.
Sometimes you get no result at all for a given request while you are sure there should be some results! This might happen if the overpass server returns with some error (too busy, time-out, too many requests from your IP address, etc.). OpenPoiMap currently ignores all such errors and simply displays nothing.
Thanks
Developing this tool was done with the help, inspiration and code from:
- ligfietser [4]
- Allroads [5]
- PeeWee32
- noordfiets
- Sander H
- Gertjan Idema
- http://www.netzwolf.info/kartografie/openlayers/
- icons from https://mapicons.mapsmarker.com/
- User:Marczoutendijk
