Ceyx
If you know about the current state of affairs, please help keep everyone informed by updating this information. (Discussion)
| Ceyx | ||||||||||||||||||||
|---|---|---|---|---|---|---|---|---|---|---|---|---|---|---|---|---|---|---|---|---|
| Author: | user:Spaetz | |||||||||||||||||||
| License: | GNU GPL, either v2, or any later version | |||||||||||||||||||
| Platforms: | Windows, Linux, and macOS | |||||||||||||||||||
| Status: | Broken | |||||||||||||||||||
| Version: | (no stable release) (2010-10-01) | |||||||||||||||||||
| Language: | English
| |||||||||||||||||||
| Source code: | https://sourceforge.net/p/render-mymap/code/ci/master/tree/ceyx-mapcss/ (unofficial fork) | |||||||||||||||||||
| Programming language: | Python | |||||||||||||||||||
| ||||||||||||||||||||
Ceyx was a MapCSS parser and renderer written in Python. It is licensed under the GPL v2+. Its main developer is Sebastian Spaeth. Ceyx is currently not maintained (2021), and original source code repository is not available. You can still get the source code from the link in the side box.
Source code
- The source code was in a mercurial repository at: [1] - which has been deleted.
- The source code's unofficial fork is available in another project's repo that is based on Ceyx Render MyMap.
Features
- Easy to install, python, python-cairo, and python support for pango (python-gtk2) is all you need
- Rendering directly from .osm files
- Outputting .png files at desired size, at desired zoom level
- Batch rendering of adjacent tiles from a single .osm file, with files being put into a directory structure suitable for viewing via slippymap.
- Easily restrict image boundaries to a regular tile
- Some support for text names along curved paths
- Supports most of MapCSS/0.2 (although it stopped caring about recent changes in MapCSS, so styles might not be compatible)
- See the feature comparison tables at MapCSS/0.2 for details
- 'bezier=yes' for beziercurving a way
Caveats
- Very limited support for multipolygon relations and ignoring other relations for now
- No eval in CSS yet,
- no nested rules yet (way[highway] node[highway=bus_stop]
- No label/icon suppression yet
- Icons/Labels for areas are simply put in the center of the boundary box for now. Need more fancy algorithm for eg half-moon shaped areas.
- No one-way arrows
- Probably different interpretation of mapcss rules as other standard mapcss renderers.
Samples
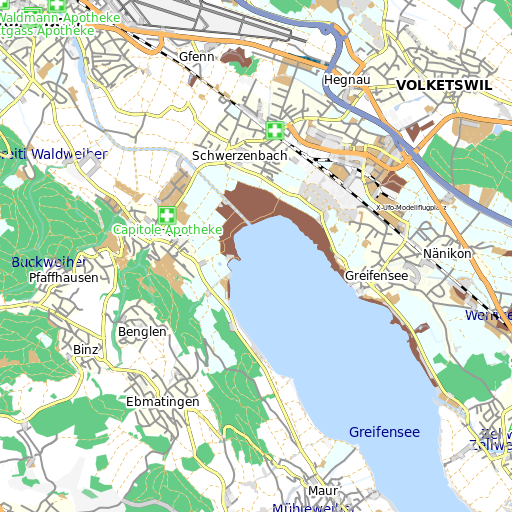
 oom level 13 in the vincinity of Zurich, Switzerland. Showing off ways, labels for nodes and areas, and the image-icon for pharmacies.
FAQ
What does Ceyx mean?
In Greek mythology Ceyx (Ancient Greek: Κήϋξ Kēüx; English pronunciation: /ˈsiː.ɪks/) was the son of Eosphorus and the king of Thessaly. He was married to Halcyone. They were very happy together, and according to Pseudo-Apollodorus's account, often called each other "Zeus" and "Hera".
- If that doesn't impress you a lot, then you just assume that the name has been chosen because both halcyon and ceyx are kingfisher birds. Pythons happen to love kingfishers :-).
Is Ceyx easy to use and install?
- System requirements: In order to run Ceyx you need python >=2.5, python-cairo (general drawing), python-simplejson (for KothicJSparser) and pangocairo (used for drawing text labels) installed. pangocairo comes on my Debian/Ubuntu box in the package python-gtk2.
- Just unzip the source, and have some data in .osm format ready. That should be all.
- Usage: When you have all that, try it out:
./osm2png.py -d data.osm -z 13 -r style.mapcss
- will produce a 512x512 png image 'map13.png' at zoom level 13 based on the osm data in data.osm and using the mapcss style sheet style.mapcss.
./osm2png.py --xy 1024,2032 -z 12-14
will produce map12.png, map13.png, and map14.png using the boundaries for the tile 1024,2032 (tile id as calculated by initial zoom level 12). So you need to make sure that the data for that tile is in data.osm. More about tiles calcuations.
Check ./osm2png.py -h for further possible command line options.
How can I render only a certain area or a tile?
- Ceyx will always try to render the whole data file, so you usually won't be using planet.osm as a data source...
- It will use boundaries as image corners, and bounds are used in descending priority:
- passing in of boundaries via the -b lat1,lon1,lat2,lon2 command line option
- passing in of boundaries via the -xy x,y command line option which calculates the image boundaries for the tile x,y at the initial zoom level to be rendered.
- Boundaries given in the .osm file as e.g.:
<bounds minlat="47.338822694821999" minlon="8.61328125" maxlat="47.398349200359256" maxlon="8.701171875"/>
- If the .osm file does not contain any bounds and no command line parameters give any bounds, it calculates the boundaries from all the data in the .osm file, ie it will fit all data in the file on the image.
- Note: As ceyx tries to render all of the data file in any case, it will e.g. fill 'landuse' areas whose points lie all out of the bounds but whose area covers the image.
How can I batch render a larger area into multiple tiles (for convenient viewing with a slippymap)?
Use the: --batch=x,y option to render x*y tiles (to the right and bottom) using the data set. This should be combined with e.g. an -xy option for rendering a specific tile, and can be combined with -d to put the resulting tiles in a directory that can be used by slippymap. E.g.:
--batch=2,2 --xy 312,256 -d slippy_out
whould create the tiles:
- slippy_out/12/312_256.png
- slippy_out/12/312_257.png
- slippy_out/12/313_256.png
- slippy_out/12/313_257.png
Combine this with the -z option, e.g. -z 12-15 to create a slippymap containing multiple zoom layers (this will create the directories slippy_out/12|13|14|15).
Bear in mind though, that it will parse the whole data file for each zoom level, so using large data files on high zoom levels might suffer from performance problems.
How to specify output image dimensions
- -s <width>[x<height>] will produce the specified image size. Height will be the same as width if omitted. This is independent of zoom level. Any zoom level will result in the same output image dimension and will contain the same map area, just the rendered details differ as the MapCSS file specifies.
- -a Preserve image aspect ratio by adapting height (ignoring specified height).
- When no -s is specified it will calculate the image size for each zoom layer automatically to be 256 * (zoom - 11) to fit the regular map tile size (with a minimum size of 256 for zoom levels lower than 12).
I want to build my own render based on your MapCSS parser. How?
Glad you ask, this snippet will currently return all styles that apply to a certain element at zoom level 13 as a dict of dicts.
 import xml.etree.ElementTree as ET
 from ceyx.MapCSS import MapCSS

 class OSMstyle:
   def __init__(self, cssfile):
       # load and parse the CSS
       self.mapcss    =  MapCSS(cssfile)
   def get_style_for_ele(self, ele, zoom):
       rules = self.mapcss.apply_to_ele(ele, zoom)
       return rules

 if __name__ == '__main__':
   osm2svg = OSMstyle("style.mapcss")
   #create a fake element to ask the style for
   ele = ET.Element("way")
   tag = ET.SubElement(ele, "tag")
   tag.set("k", "highway")
   tag.set("v", "motorway")
   print str(osm2svg.get_style_for_ele(ele,13))
E.g. the above snippet currently returns:
{'centerline': {'text-halo-radius': '2', 'color': '#809BC0', 'linecap': 'round', 'casing-width': '0.5', 'width': '6.5', 'z-index': '0.5', 'font-color': 'black', 'linejoin': 'round', 'font-family': 'DejaVu', 'text-halo-color': 'white', 'casing-color': '#202020'}, 'label': {'font-size': '7', 'text-halo-radius': '1', 'fill-opacity': '0', 'text-position': 'line', 'width': '0', 'z-index': '5', 'text-color': '#000000', 'font-color': 'black', 'font-family': 'DejaVu', 'text-halo-color': 'white'}}
with the default style sheet. Have fun.
Compatibility Notes
Canvas:
- canvas antialiasing: 'full' and 'text' work. 'none' will still antialias text.
Icons:
- icon-image: can currently only take a local .png file, no remote files and no other file formats. And it can be applied to a way (in which case it will draw the icon in the center of the area.
Labels:
- font-variant: Only provides small-caps if the font supports it. Will fallback to regular font if not. (eg DejaVu does not provide small caps it seems).
- max-width: if a label is wider than 'max-width' chars, this will word-wrap onto the next line. Lines are unfortunately left-aligned. (Please fix to center multiple lines).
MapCSS:
- stacked rules: To be filled in.

