ORS Wheelchair Routing Help
Rollstuhlrouting.de/ruhr2010 - Help
The following features are basically feasible with ORS Wheelchair Routing (Ruhr 2010 - barrier-free Wheelchair Routing):
- Browse the map.
- Search for the location of an address or its geographic position. Furthermore search for points of interest (POI) such as public facilities, restaurants or hotels.
- Request a route. Attributes which are especially important for wheelchair users, such as the maximum incline, the surface condition and maximum curbstone height, can be considered with the route request. I addition it is possible to request a route to a point of interest (POI) with the option that this facility is barrier-free.
- Time- and Distancecalculations of the requested route.
Map
- Pan
There are three possible ways of panning the viewed map section:
- Use the navigation cross in the upper left corner of the map.
- Click into the map and while holding the left mouse button drag the map.
- Using the keyboards arrow keys to pan to the corresponding direction
- Zoom
Altogether there are four different possibilities to zoom to a certain location in the map:
- Use the 'Zoom'-Toolbar in the upper left hand corner of the map (+: zoom in; -: zoom out)
- Scroll with the mouse.
- Select a location with the left mouse button while holding down the 'shift' key.
- Double click with the left mouse button on the desired location.
Display Options (Layers)
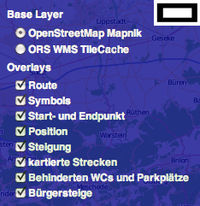
Select the option "weitere Karten" (more maps) in the upper right hand corner of the map to activate the display toolbar. It is possible to select among different map layouts ("Base Layers") and different attributes which should be visible in the map. The attributes are grouped in the subitem "Overlays".
- Base Layer
Altogether there are two Base Layers available:
- OpenStreetMap Mapnik:
- ORS WMS TileCache:
- Overlays
It is possible to choose among eight different attributes which can be displayed in the map. Select an attribute by activating the checkbox next to it.
- Route: Display the requested route.
- Symbols:
- Start- und Endpunkt (Start- and ending point): Mark the starting and final point with different colored arrows.
- Position:
- Steigung (incline): Use this tool to display all streets and paths which are steeper than 4%. These are represented by different colored warning triangles.
- kartierte Strecken (mapped areas): Displaying the mapped areas for this project.
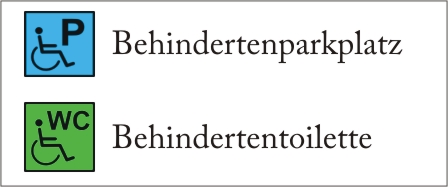
- Behinderten WCs und Parkplätze (Toilets and parking spots for handicapped people): Use this tools to display all toilets and parking spots for handicapped people.
- Bürgersteige (curbstones): This tool will display all mapped curbstones in the map. The different heights are expressed through differently colored lines.
(More detailed data concerning the symbology can be found in the section: "Legend")
Search
A basic feature of the barrier-free wheelchair routing "Ruhr 2010" is the simple search for addresses itself or points of interests (POI) in the nearby area to the selected starting point.
- Basic search of a location:
- Enter an address or postal code in the textbox of the section Set starting point (Startpunkt bestimmen)
- Confirm the address by pressing the "Set starting point" (Startpunkt bestimmen) button
- Search an address next to your location:
- Fix the starting point by the progress described above
- Select the option Search for address (Suche nach Adresse) in the section Set end point (Zielpunkt bestimmen)
- Enter the destination address or town in the textbox of the section Set end point (Zielpunkt bestimmen)
Comment: If the entered address is not precise enough, there will be a selection of possible addresses beneath each textbox. Select the correct address by clicking on it.
- Search a POI next to your location:
- Fix the starting point by the progress described above
- Select the option "Search for POI" (Suche nach POI) in the section Set end point (Zielpunkt bestimmen)
- Select the wanted POI via the selection button What are you looking for? (Was suchen Sie?). The demanded point of interests are categorized by the following groups: public transport (ÖPNV), facilities (Einrichtungen), leisure (Freizeit), sport (Sport), stores (Läden), tourism (Tourismus).
- If only barrier-free POI's shall be displayed, select the box next to the option only barrier-free facilities
- Confirm the demanded POI via the "Search location" (Suche Ort) button
Routing
Set starting- and end point
Start point
There are three possible procedures to determine the starting point:
1. Possibility:
Fix a starting point by entering an address in the textbox of the section Set starting point (Start bestimmen) (for more details see: Search)
2. Possibility:
- Select the textbox Set starting point (Start bestimmen). The textbox will be highlighted.
- Zoom to the desired location in the map
- Left click in the map onto the desired starting point - the position of that point will be displayed in the starting point textbox
3. Possibility:
- Zoom to the desired location in the map
- Right click on the map onto the desired starting point
- Choose set start - the position is taken to the starting point textbox
End point
According to the determination of the starting point there are different possibilities on how to select the demanded end point:
1. Possibility:
Fix an end point by entering an address in the textbox of the section Set end point (Zielpunkt bestimmen) or by selecting a POI (for more details see: Search)
2. Possibility:
- Select the option Search for address in the section set end point (Zielpunkt bestimmen)
- Select the textbox Set end point (Zielpunkt bestimmen). The textbox will be highlighted.
- Zoom to the desired location in the map
- Left click in the map onto the desired end point - the position of that point will be displayed in the end point textbox
3. Possibility:
- Select the option Search for address in the section set end point (Zielpunkt bestimmen)
- Zoom to the desired location in the map
- Right click on the map onto the desired end point
- Choose set end - the position is taken to the starting point textbox
Options
If the determined route should fulfill additional conditions, such as maximum incline, the surface condition and maximum curbstone height, they can be selected in the section options (Optionen). By clicking onto the respected selection box next to each attribute it is possible to change or to set the desired value of each attribute individually. For example: It is possible to determine the maximum ascent at 4%, the maximum curbstone height at 7cm and the surface condition at all surfaces.
Route calculation
- After setting the starting and end point of the desired route and the determination of its properties it is possible to calculate the route via the Calculate Route (Route berechnen) button.
- The course of the route will be displayed in the map in a new window. Additionally the operating instructions are displayed, which include the individual intermediate steps and their distances.
- By clicking on one of the individual intermediate steps of the operating instructions that particular step will be displayed in the map through a red arrow.
- Track informations, such as the total length or total travel time (at an average of 4km/h), are displayed at the upper left corner, beneath the heading
- Via the option Edit Route (Route bearbeiten) (beneath the Route heading) it is possible to change the route afterwards as well. Besides that it is possible to move the starting and end point arrows in the map around.
Additional Options
Download GRX-Track (GRX-Track herunter laden): Left Click on this option will start the download of the GRX-Track of the desired route.
Download XML (XML herunter laden): Left click on this option starts the download of the XML links of the wheelchair routing homepage.
Legend
in progress


